Laplass
A Graphics Engine that uses ‘GameObjects’; entities that are programmed with behaviors used to create physical simulations in 2D and 3D. Designed to create browser-based content to allow instant access to users with no installation needed. Made with JavaScript, PixiJS and ThreeJS.



What it is
Laplass is a graphics and physics engine that can be used to create physical simulations in 2D and 3D. It is designed to make browser-based programs with the objective of allowing users to access content instantly without an installation process. Laplass uses WebGL powered by PixiJS and ThreeJS to render its content. Laplass uses ‘GameObjects’; entities that can be programmed with behaviors which then it executes when the simulation is started. See GameObjects.
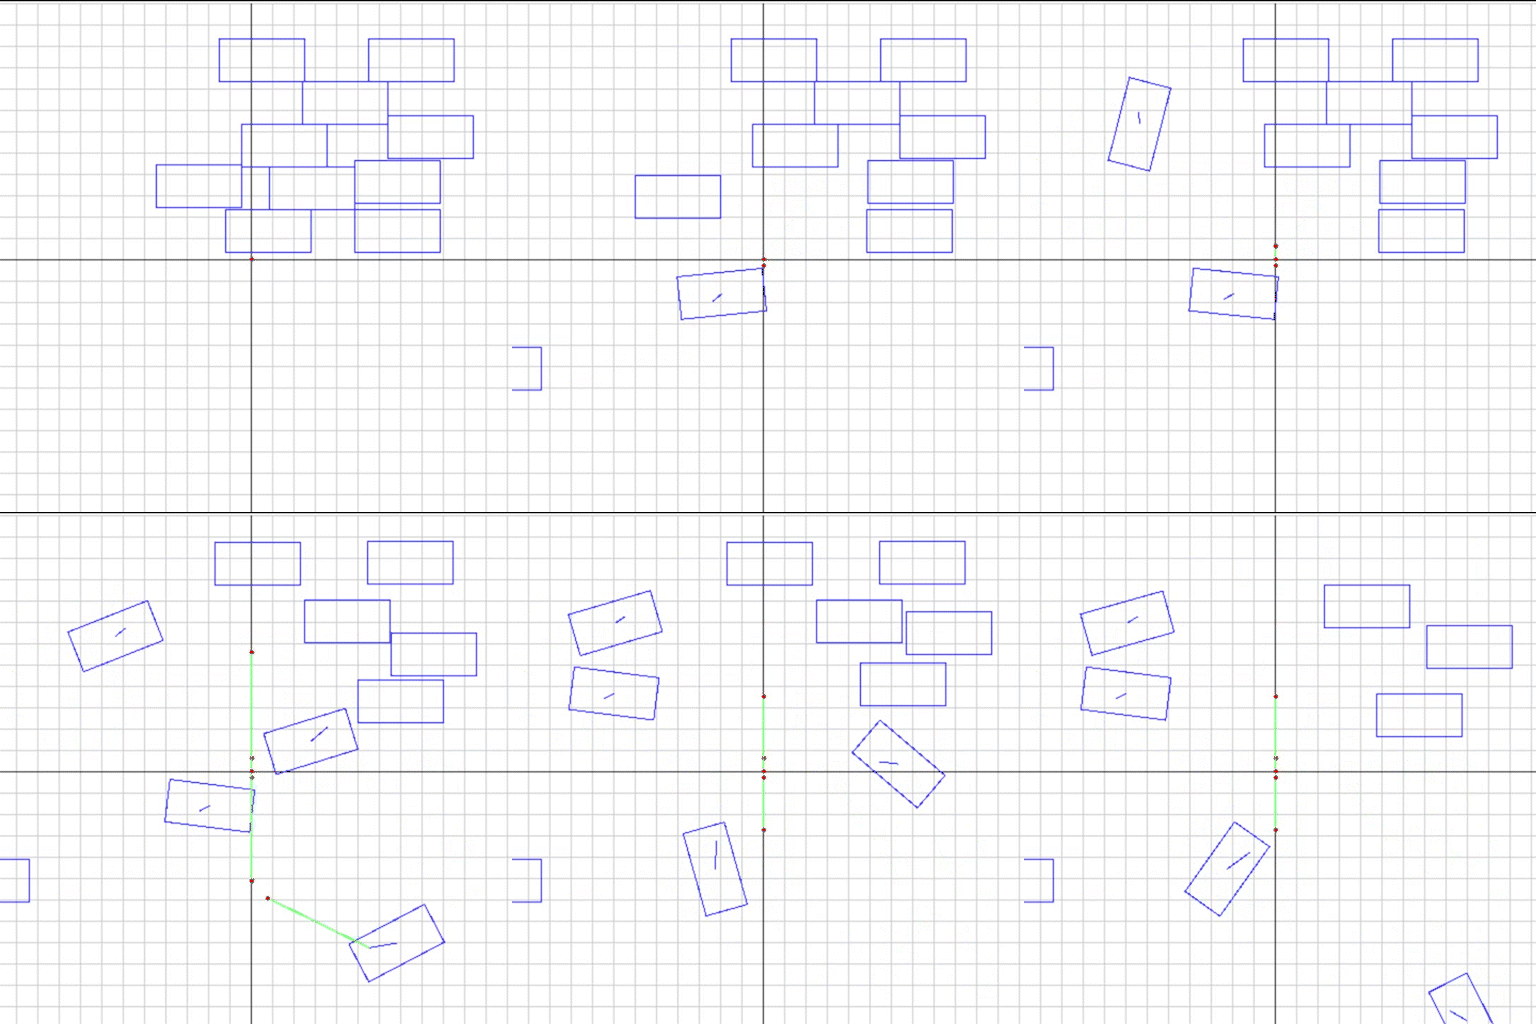
Laplass has physics functionalities like vector forces and collision detection. Laplass actively tries to avoid overlap between physical objects using the SAT algorithm (see SAT), then simulates exchange of linear momenta for realistic collision.
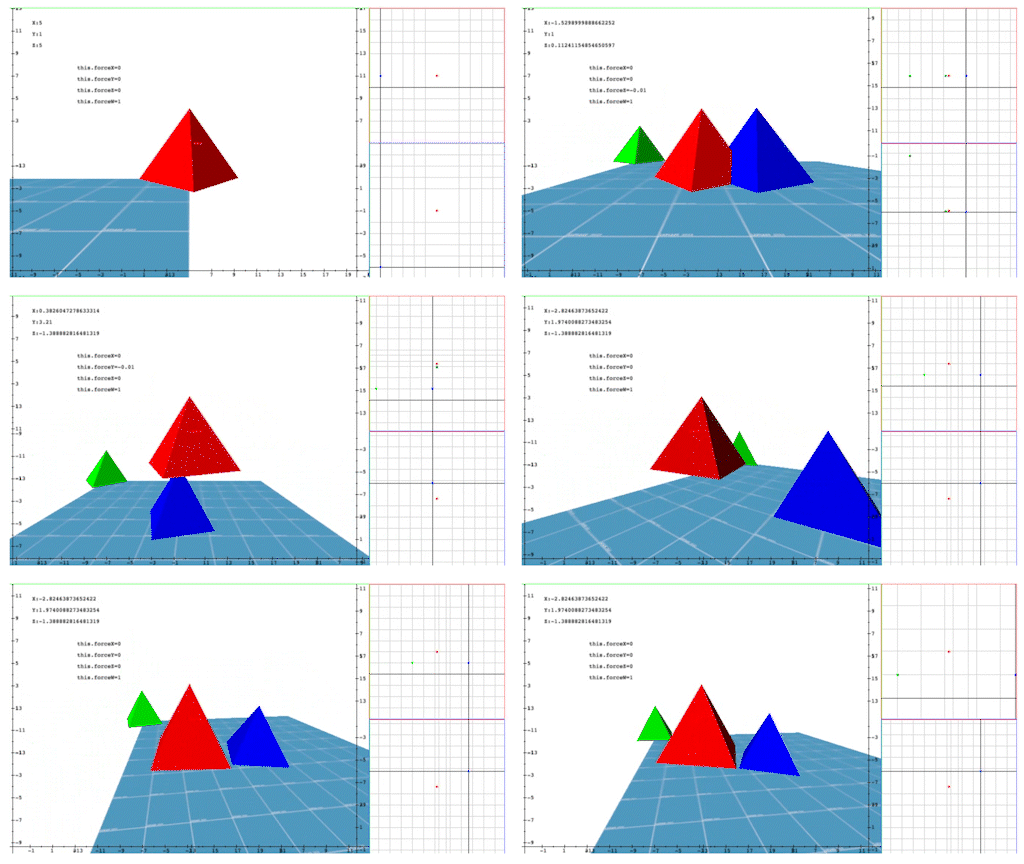
Laplass is capable of rendering 3D scenes using ThreeJS. Laplass allows importing 3D models, and then by the use of GameObjects one can assign behavior and render them. The XY and XZ views are work in progress, but they are supposed to display force vectors and object positions at all times.
Installation
Laplass is an incomplete program since it only provides the tools to make browser-based content. It doesn’t contain a GUI, so all functionalities are accessed with JavaScript files. The first step is to clone the GitHub repository into your system. Laplass uses a NodeJS server to launch its JavaScript code and NPM as the package manager. Install NodeJS and NPM by referring to instructions specific to your platform.
Then install nodemon,
> npm install nodemon
To run it, open terminal and navigate to its folder. Type `> npm start` to run the server. NodeJS will deploy the program at localhost:3000. Open a browser and type that address into the address bar.
Usage
Laplass uses a concept called ‘Scenes’. These can be thought of as a playground where your GameObjects carry out their behaviors and interact with one another. Scene files are JavaScript code that needs to be imported into the app.js file.

Next, we write the scene file. A scene file needs to import Engine.js and YourObject.js. yourObject.js is a file that you make for the GameObject you want to add to the scene. Engine.js gives you access to the functions it provides so you can tell it what to do. Every scene file needs to have the runScene() function defined.

It also needs to be exported so that app.js can use it to execute the scene.
Next, we create an instance of yourObject by writing:

Finally, this instance of yourObject needs to be registered with the Engine so that it’s aware of its existence. The Engine will add it into the main program loop and carry out behaviors you defined in it.

Up to this point, we haven’t defined YourObject. So, we create a file called yourObject.js and import Engine.js into it.

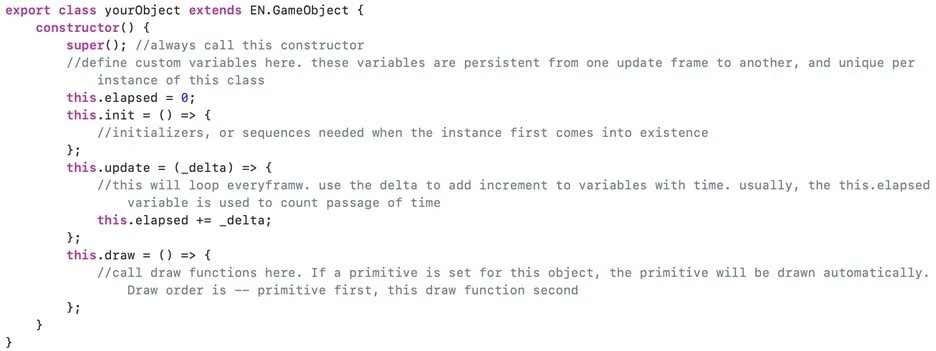
The next step is to create a class with the same name as your .js file, then extend it from EN.GameObject. The structure of the GameObject should look exactly like this:
More details on how to use Laplass can be found by referring to the code samples in public/Samples.
How it works
The program flow of Laplass can be described as follows:
- Initialize
- Views
- Events
- Program Loop
- Initialize Instances if not already
- Initialize Collisions
- Run the loop
- Update Instances
- Flush Collisions
- Clear all the views for drawing
- Draw Instances
Initializations
Views in Laplass starts from index.html where all the canvas elements are defined. PixiJS uses these canvas elements to draw graphics. Laplass uses three views in total: Perspective, XY and XZ. These different views facilitate in observing simulations from multiple directions. Laplass contains its own coordinate system (we’ll call it LPCoordinates). Everything that happens in the simulation is defined in terms of these coordinates. When the program needs to draw contents onto the screen, it converts those LPCoordinates into their corresponding two-dimensional screen coordinates.
Events act as interrupts that is detected throughout the program. Laplass checks for any triggering conditions every single frame, and when an event is fired, it can be detected by the GameObjects which helps them decide what to do next.
Program Loop
Instances are initialized at this stage of the program because the Engine needs to have started running. Each instance comes with their init() functions which defines actions for the instances to perform during their creation. These functions are executed one by one during this initialization phase.
Collisions also needs initialization because Laplass needs to create and maintain a data structure to keep track of overlap between all the instances in a given frame.
The main program loop is run by the Ticker in PixiJS. The ticker outputs a delta-time variable which Laplass passes onto each instance during runtime so that they can carry out time-related behaviors (for example velocity). Laplass does so by executing the update() function of each instance one by one, which makes all instances update their behavior one frame at a time. After Laplass is done updating all instances, it flushes the collision data structure to prepare it for the next frame. After this, the views are instructed to clear all their graphics. Laplass now executes the draw() function in each of the instances, and thus a single frame is now rendered.
GameObjects and Instance Handling
GameObjects in Laplass are entities that can be programmed with behaviors which will then be executed when the simulation is launched. GameObjects are defined in their own JavaScript files and can be named like yourObject.js. This definition file needs to contain the class named after yourObject and needs to be extended from the GameObject class. Access to this class can be obtained by importing Engine.js into the project. We now have a class called yourObject which is a child class of GameObject. It inherits all of the functions and private variables of GameObject, as well as three specific functions called init(), update() and draw(). These three functions are where we define the behaviors for yourObject. The next step is to import yourObject.js into a scene file, where an instance of yourObject needs to be created. This is where the initial positions for the instance can be set, for example you might want it to appear at the center of the scene.
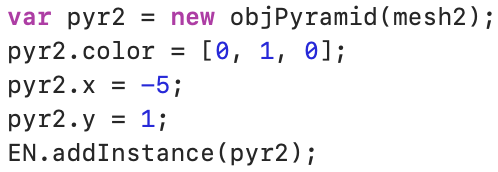
An instance is made, its initial values specified, then registered with Laplass
Laplass stores instances of a scene in a data structure. Whenever an instance is created in the scene file, it also requires to be registered with Laplass so that the instance’s address can be added to the data structure. Laplass later uses this data structure to iterate through all the instances in the scene and execute each of their update() functions one at a time. This allows all instances in the simulation to update at the same time every frame.
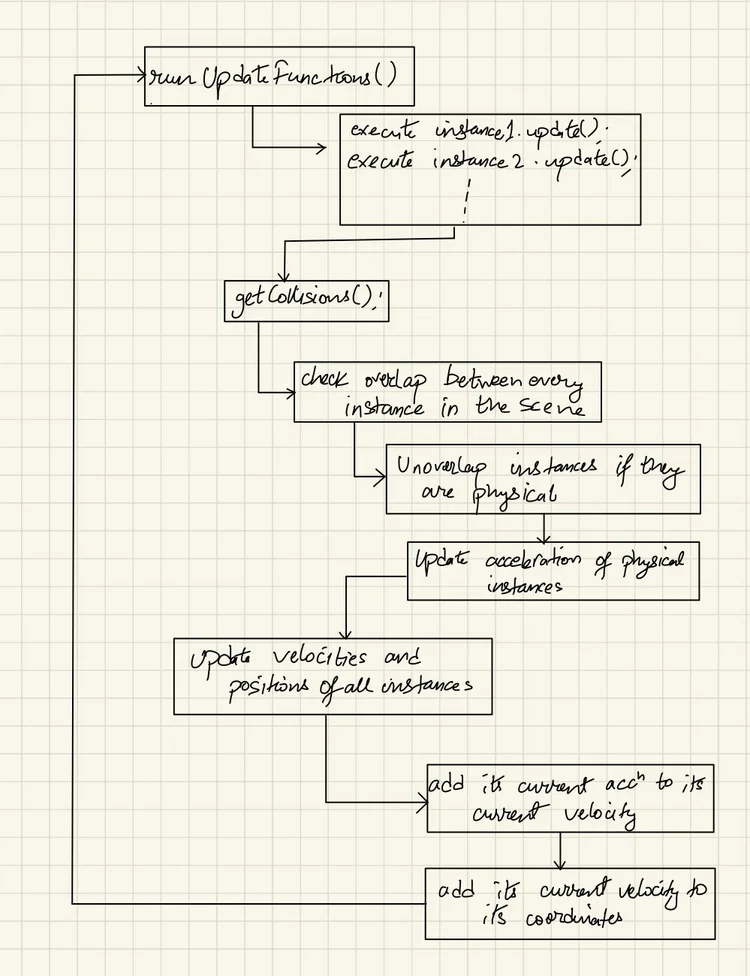
There is a specific order in which Laplass updates all the instances.
- The function of all instances needs to be called first. For example, this is where the initial acceleration of all physical instances is calculated after their reaction to forces.
- Laplass looks for overlap between all the instances in the scene. First overlap is checked with bounding boxes, and second overlap is checked with SAT. Bounding boxes are cheaper than SAT, so we avoid using SAT if we can.
- If physical instances are overlapping, they will be moved apart along their MTV (Minimum Translation Vector). If they are regular instances, it will fire a collision event which can be handled by the instance.
- The acceleration of physical instances is updated through calculation of their exchange of momentum after collision.
- We add the final acceleration values of all instances to their respective velocity values and add their velocity values to their respective x and y (and z) coordinates.
The JavaScript file of yourObject is where all the definitions reside. This definition file is imported into a scene file where an instance is made from it, which then gets registered with Laplass.
The definition of yourObject starts from a constructor. yourObject can contain its own variables too since it is simply a child class of GameObject. These variables can be something like this.force or this.friction. These are the kinds of variables that need to be declared at the start of the instance’s life cycle because either they need to start off at a specific value, or they need to hold a value, or they might be a variable that stores the state of an object for example its y-coordinate. Variables that need constant updating throughout yourObject’s lifecycle needs to be here first.

The init() function is where routines can be defined that you want the instance to execute when it gets first created. First example, you might want the object to start off with a certain velocity, so we put
this.hspeed = 1;
that will make the object go to the right at the speed of 1.
The update() function is what the Engine will execute every frame. If you type
this.hspeed += 1
the object will start gathering speed every single frame.

This example demonstrates how to animate an oscillating instance
There is a delta variable that can be seen being passed onto the function. The main program loops via a Ticker provided by PixiJS. The delta variable from this ticker is distributed to all instances in the scene to keep track of time. It is this variable that we use to execute time-based actions such as animations or reaction to physical forces. The diagram above also makes clever use of this.elapsed variable by having it count the time value, resulting in the cosine function returning an oscillating value for our animation.
The draw() function is where the Engine will execute the drawing commands from the object. In Laplass, the instances in the scene oversee drawing graphics. The graphics functions are defined in the Engine itself, but they are executed by the instances. Refer to Engine.js and EngineCore.js for details. This function is also what the Engine executes every single frame. You can put update() code in draw(), but it is not recommended in order to keep things simple.
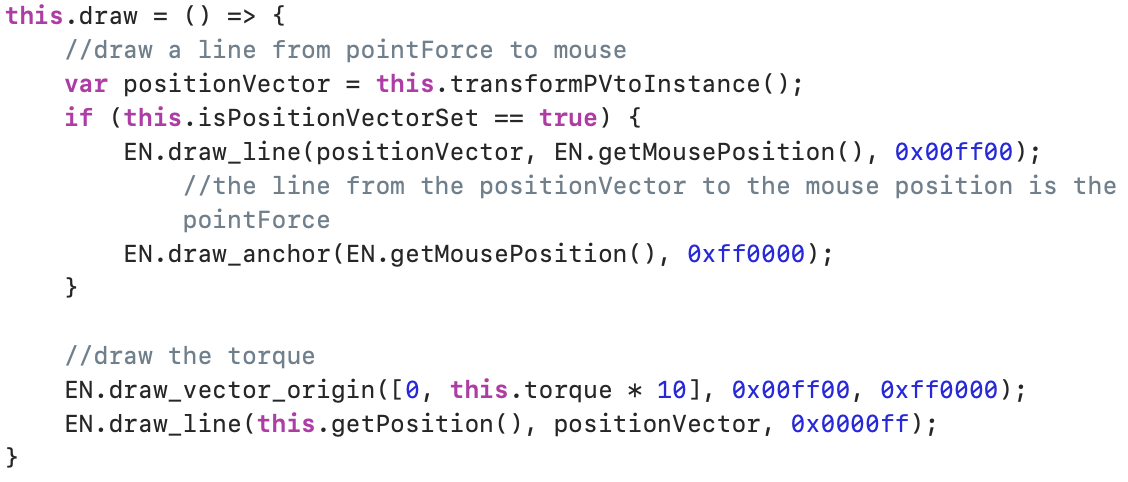
Example demonstrating the rendering of pointForces
The physical aspect of GameObject can be activated by marking that object as a physical one. It is done by calling this.setPhysical(true) in the object’s init() function.

Physical objects are handled the same way as regular objects, except the exchange of linear momentum is only done for the physical ones. Collision detection and updating acceleration, velocities and coordinates is done for both regular and physical objects. Motion of physical objects is best handled by using forces and calculating its acceleration in response to those forces. It is recommended to let Laplass handle the velocities and coordinates to prevent interference with its physics calculations.
You can refer to public/scripts/Samples for more details.
GameObjects can also read events. If yourObject wants to sense a mouse click for example, it will have to query Laplass for the firing of a mouse click event every single frame. This is achieved by declaring a user-made function like ‘checkEvents()’. We put our event checking code in there, along with what is supposed to happen, then plug this function into the topmost spot in the update() function. We want this to be executed before anything else.

You can view the sample codes in public/scripts/Samples.
GameObject offers a set of functions to control its state which you can find in public/scripts/Engine/modules/Instances.js. It is recommended to use the getter and setter functions instead of modifying the variables directly. Movement of a GameObject is handled by Laplass. You provide a value for its speed or velocity, then Laplass makes the required changes to its coordinates.

This shows how yourObject can be manipulated with forces like friction and torque
Laplass is designed to keep the transformations of GameObject out of sight.
Three-dimensional GameObject can also be made extending yourObject from the GameObject_3D class. It adds functions for z-axis, z-speed, z-acceleration, etc. There is no physics functionality in 3D for now.
Separating Axis Theorem (SAT)
Separating Axis Theorem (SAT) is an algorithm Laplass uses for collision detection. First, we make a list of all normal of the two primitives in question, which are axes that originate perpendicularly from their surface.
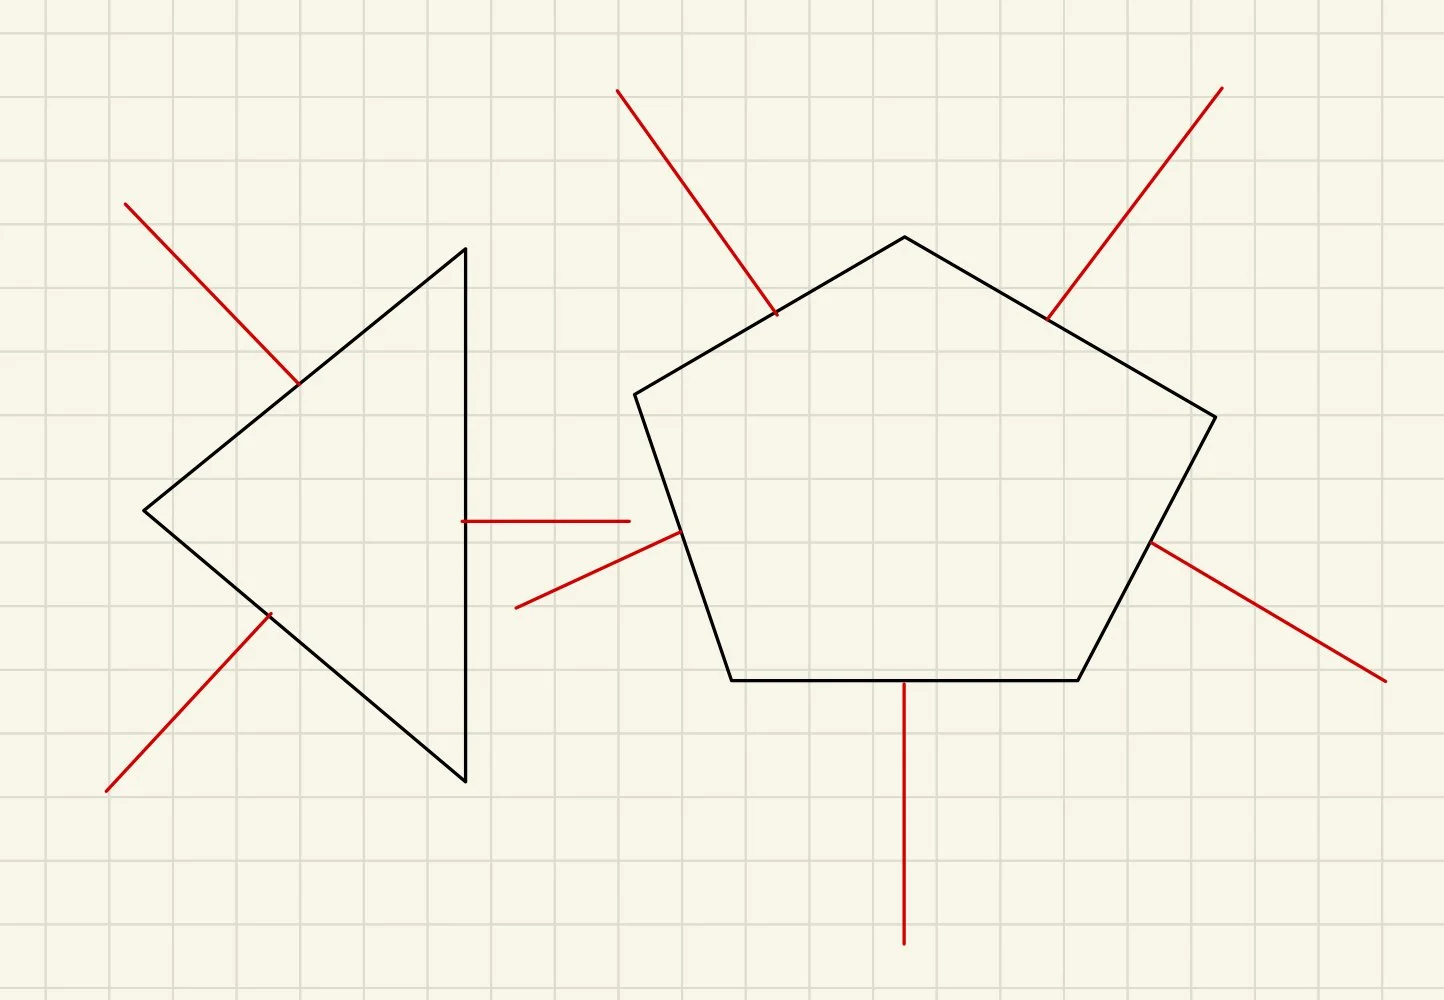
We will be looping through all the normal one by one. Start from the first normal and consider it an axis in which we are trying to check for an overlap.
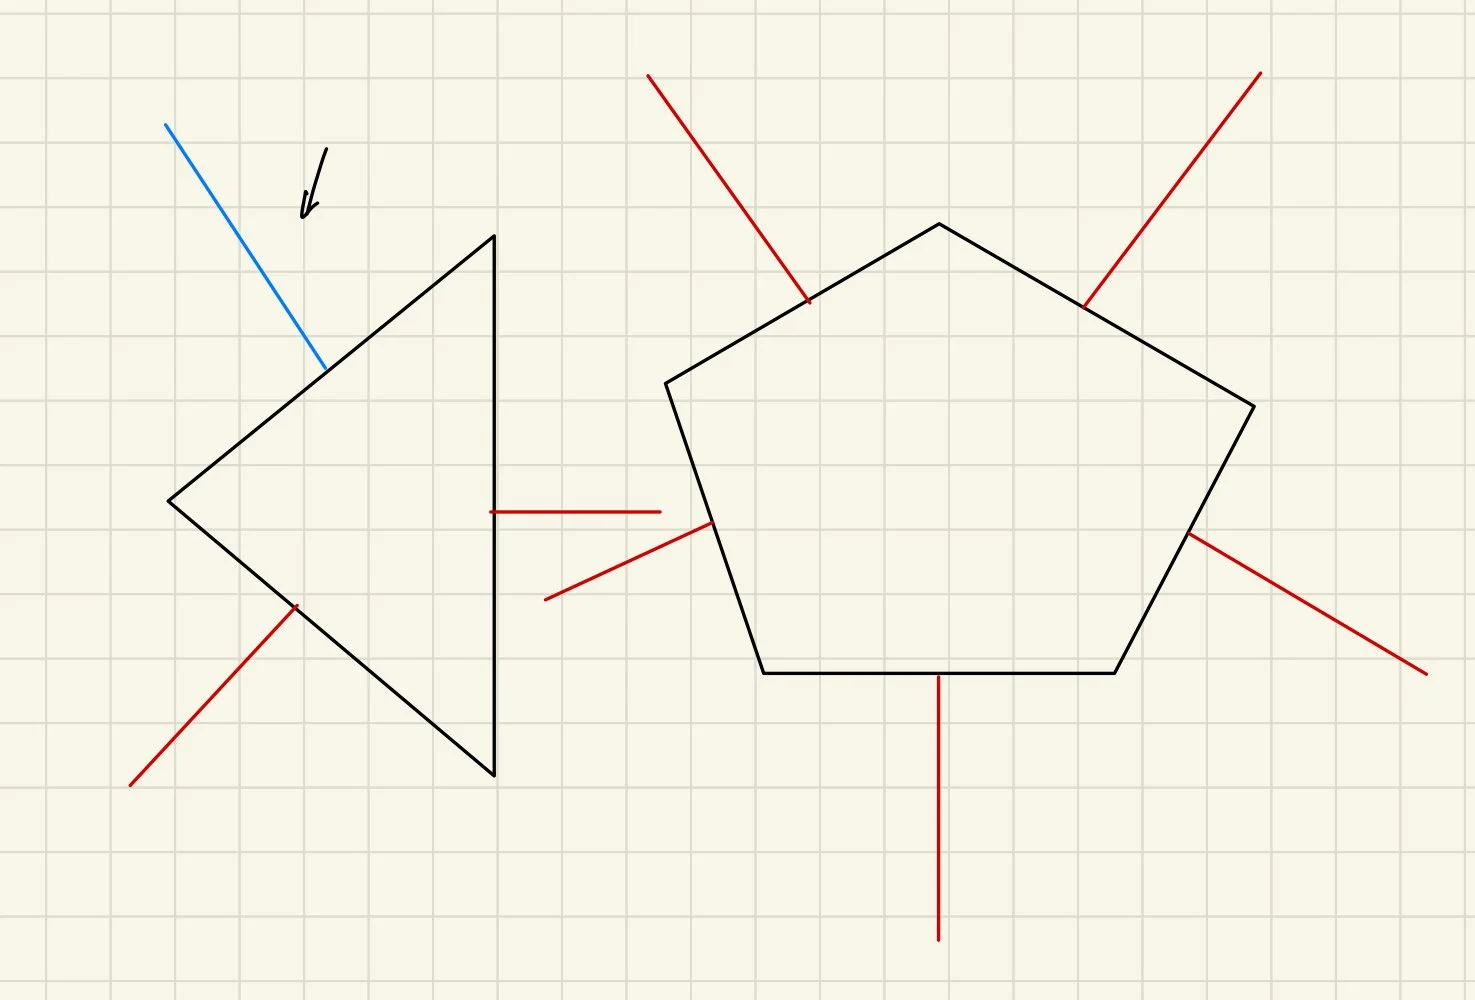
Extend the axis, then project each vertex perpendicularly from both primitives onto it.
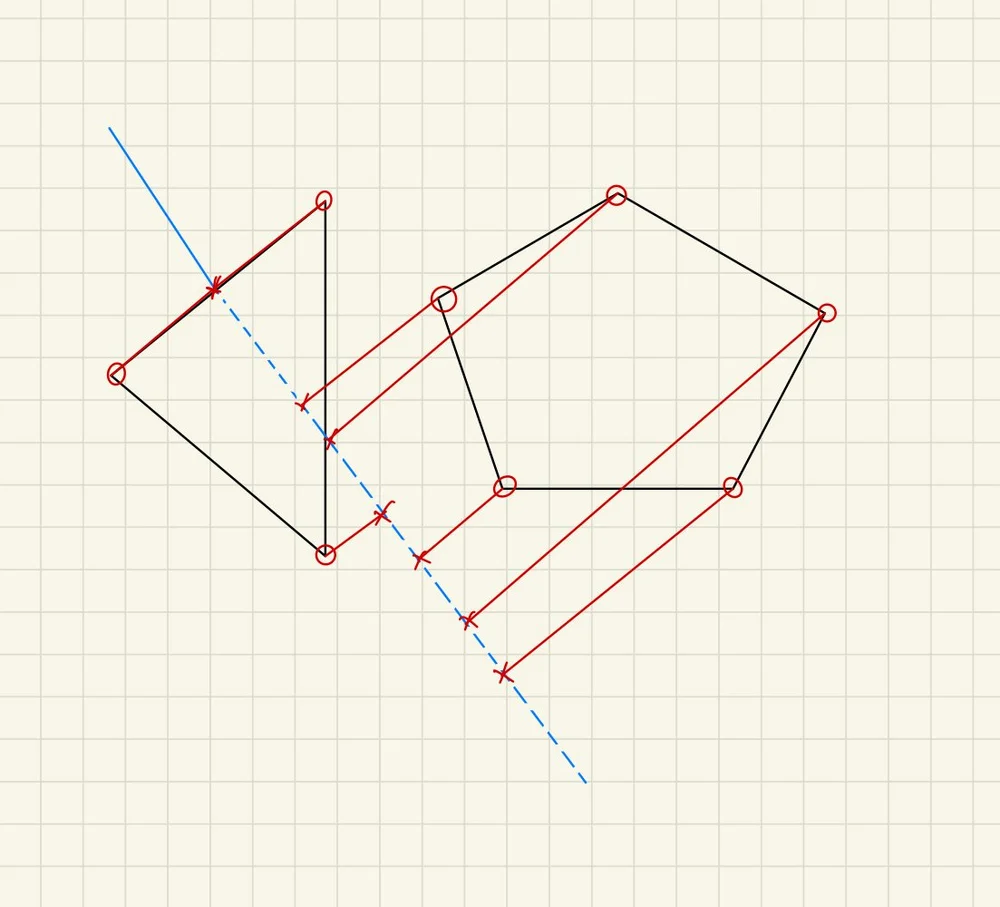
Find the edge points of both primitives on the axis which are the points that are farthest from the center of the primitive on the projection.
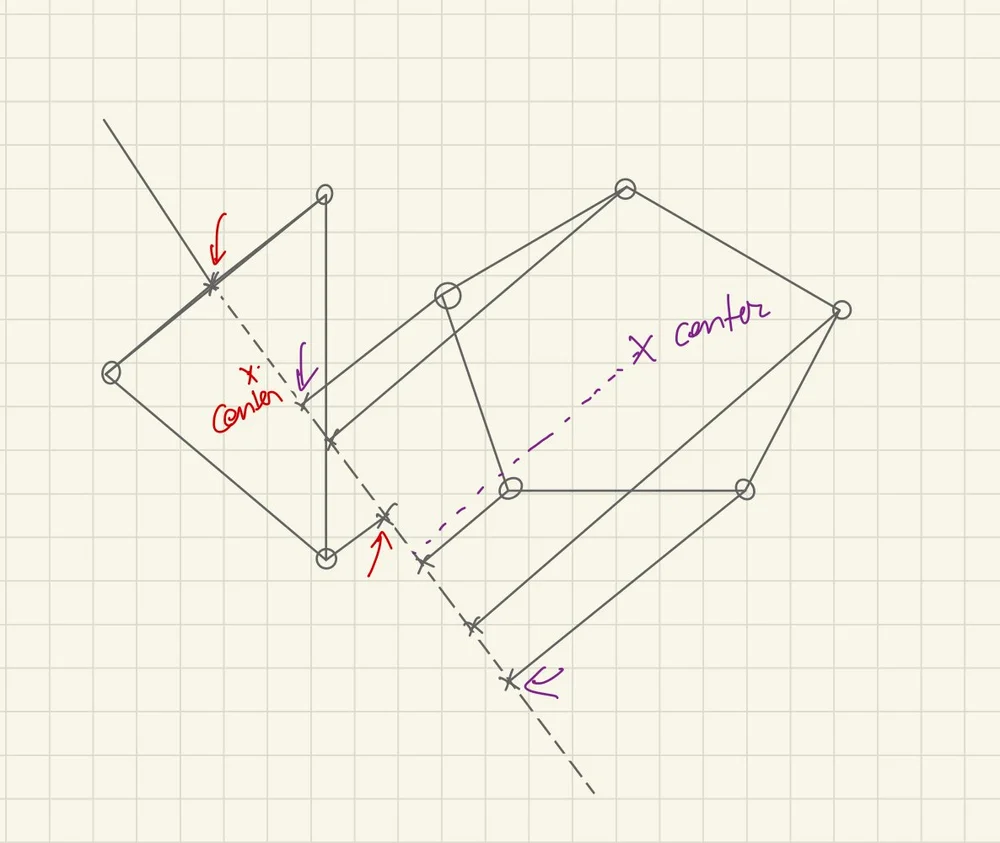
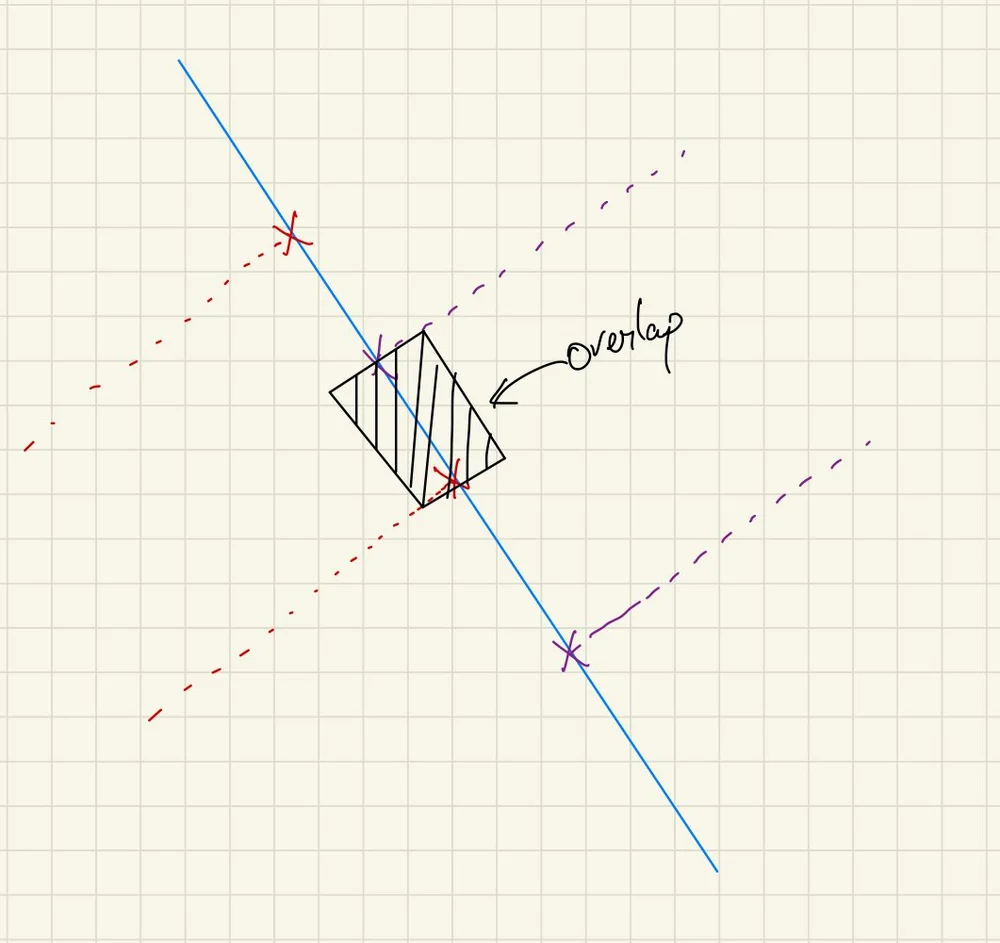
The distance between two centers is the distance between the two centers of both of the primitives. The halfwidth is the distance between any of the edge points to the center of its primitive.
The primitives are said to be overlapping on an axis if
The Distance Between Their Centers is less than the Sum of the Halfwidths of the two primitives.
In our case, we found an overlap.
Conditions where we would not have an overlap on an axis looks like this:
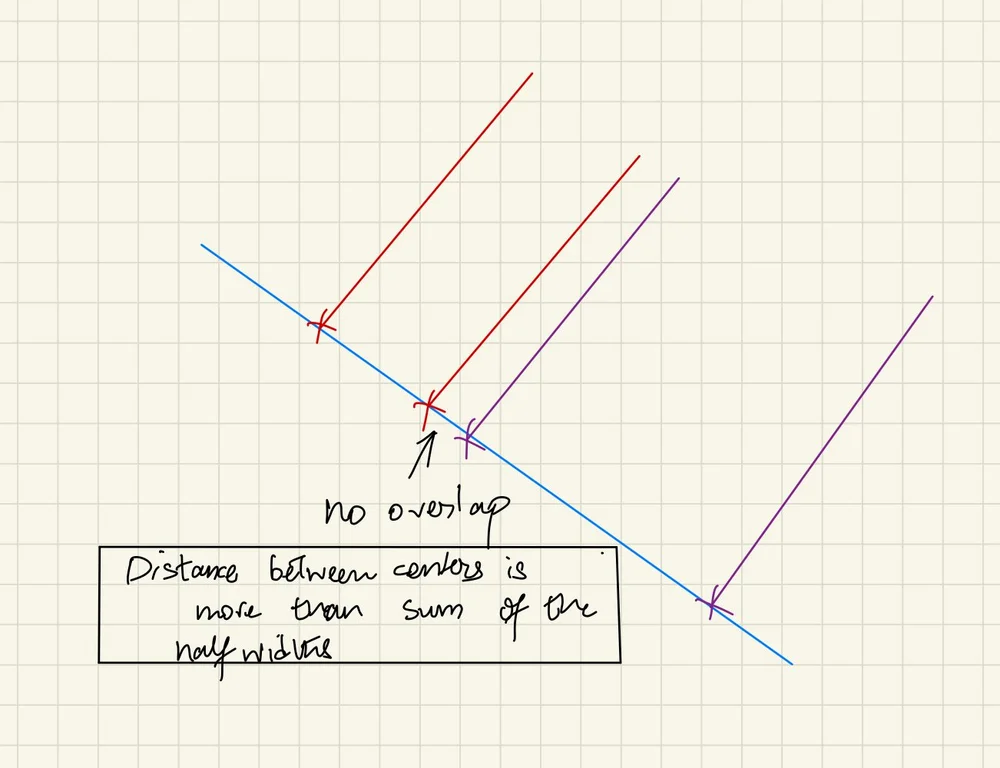
This process of checking for overlaps is repeated for every single axis of both the primitives combined. If a duplicate axis is encountered it may be skipped.
Separating Axis Theorem returns true only if the primitives are found to overlap on every single axis. If even one axis returns no-overlap then SAT returns false.
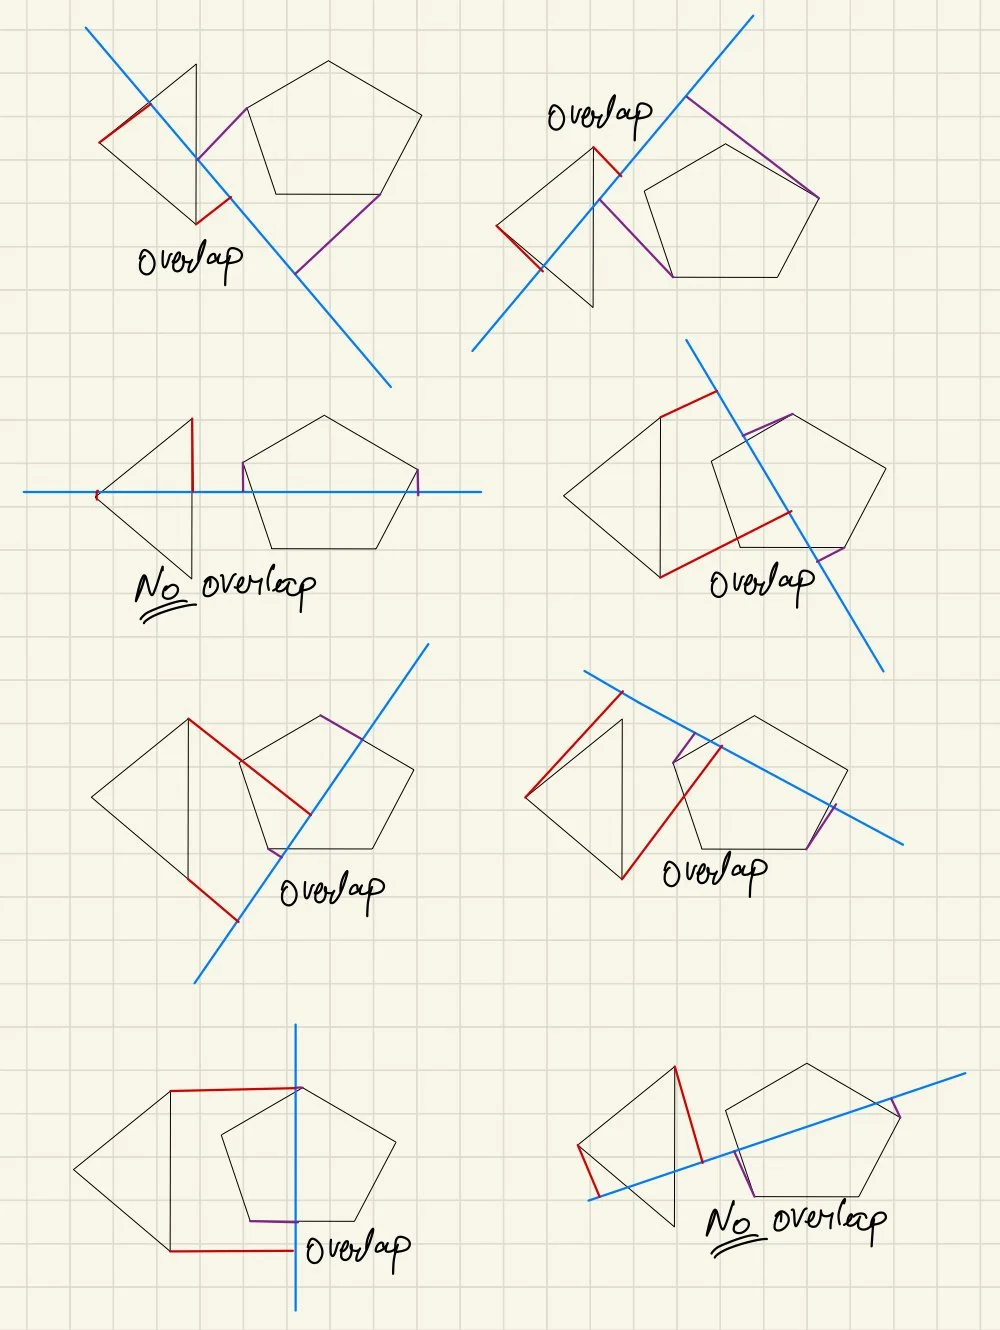
In our case, there was at least one no-overlap, so there is no collision according to SAT.
